
In a previous article we discussed a critical law to understand before lighting your subjects, The size of the source relative to the distance from subject. If you missed the previous article, it can be found in the October/November 2012 issue of The Photographer magazine.
In this edition we will examine another important law of lighting… The Law of Inverse Square. This phenomenon can sometimes seem daunting and overwhelming, but at its basis it is quite simple and important for maintaining proper exposure during the course of a session or event.
Before we continue, it is important to remember that exposure is exponential not sequential– Meaning that each stop is double or half of the stop values on either side of it. For example f5.6 is half the light (exposure) of f4.0 and twice the amount of light at f/8.0. The same holds true for ISO and shutter speed. Each stop is half or double the light, depending on which way you slide the scale. Now that we have that understanding we can go deeper.
The Law of Inverse Square states that when the relationship (distance) from the light source to the subject is changed, the output (exposure value) of the light changes at the inverse square of the distance moved. Whew! On the surface that takes a minute to wrap your head around so let’s look at this law in a basic, easy to understand formula.
Example– Move the light source double the distance from the subject, 2x. According to the rule, we must square the distance moved, 22 = 4. Now we must invert that number, 1/4. So the Law states 2x=1/(2×2)= 1/4. This means that whenever the light to subject distance relationship is doubled, we lose two stops of light and whenever it is halved, we gain two stops of light. It really is as simple as that.
Note that this law is only in effect when using an additive lighting technique, meaning you are using flash, strobe, a continuous source, reflector or other similar light source. When working outside in daylight, this law is not practiced because the relationship from the Earth to the Sun does not change.
In practical terms, how does this phenomenon affect you on a daily basis in your business. First, let’s go build on what we learned last time about the size of source rule. It states that the larger the source and the closer it is to your subject the softer the light quality will be. If you are photographing a head shot and wish to use a very soft light, you would place the light source very close to the subject to achieve that soft light needed. It works great, but by doing this you have now introduced another issue that needs attention. The law of inverse squares plays a very big role in this situation (Figure 1).
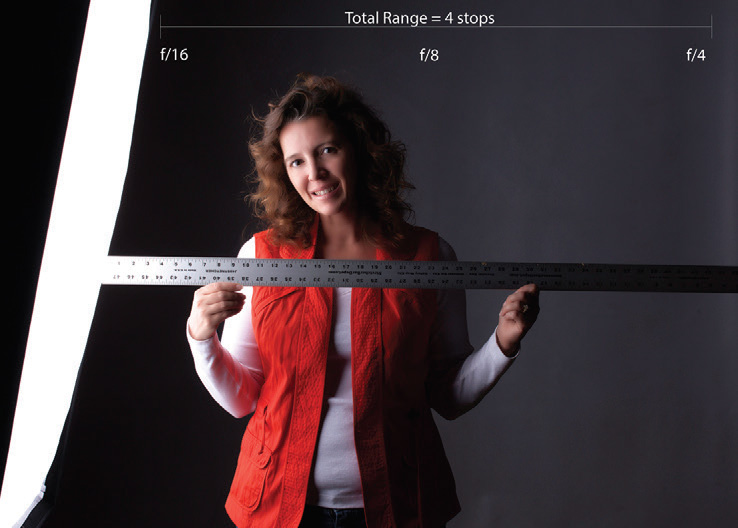
Figure 1
By having the light source this close to your subject, the camera left shoulder is now one stop brighter than the face which is one stop brighter than the camera right shoulder (Figure 1).This contrast range is a push for an individual and not acceptable for a group of two or more. What does one do? Fortunately, you have a couple of options. One is to move the light position farther away to where the fall-off is minimal reducing the effects of the Law of Inverse Square. It is important to note that the farther the light source from your subject, the greater range you can work in without dramatic fall-off. However, there is always a trade off. When the light is moved farther away, it becomes smaller, resulting in a harder light quality.
Another option is to use some sort of gobo to reduce the amount of light hitting the areas closer to the source in-turn lowering it’s exposure value, but this may require another set of hands or mounting device.
The simplest way to combat this is to just rotate your source so your subject is at the edge of the light. This will put the law of inverse square on your side as now the light from the box is more efficient, meaning it is traveling relatively the same distance to illuminate your subject (Figures 2 and 3).
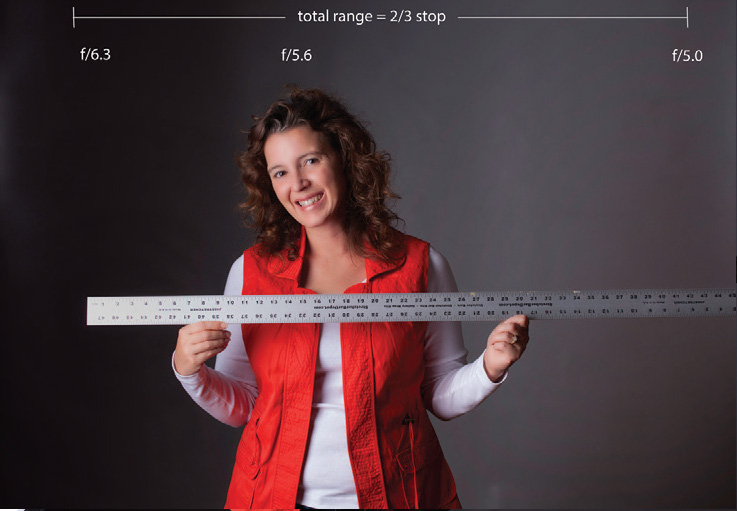
Figure 2

Figure 3
One thing we know is that exposure will be constant as long as the distance relationship form source to subject has not changed, but what to do when it does and it is not feasible to continue to meter? Use physics and science to work for you.
A practical and easy setup utilizing this is when using off-camera flash at a wedding or session with constant subject movement. Before we explore this option please note that this requires your flash set on manual and you are not using TTL technology.
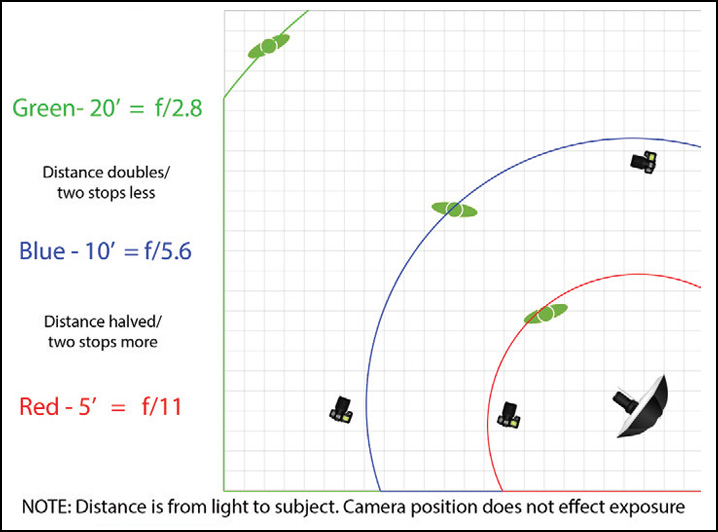
Figure 4
For instance, you are photographing a wedding reception and your light is placed on the edge of the dance floor, 10’ away from the center (Figure 4). Set your flash or light source to manual and dial in the power output you desire for the depth of Field you want. I like to set my initial output to f5.6. (I will explain why later). Typically I can obtain this aperture value with my speed-light and an umbrella set at 1/4 power and my ISO at 1600. I have found that 1/4 power is a good balance between output and recycle time.
Once the light is set, meter the light at the center of the floor. As stated earlier, I want at least a f/5.6 aperture value for this initial setting. I adjust my output and ISO until I achieve the desired output. Now I am done with the meter and know that as long as my subject is 10’ away from my light, the exposure is f/5.6. Using the law of Inverse square, I can easily open or close my aperture based upon where my subject is at any given time. If they are closer to the light, lets say 5’ (half the distance) my exposure is now f/11 …two stops brighter than f/5.6.
Conversely, if they move to the other side of the floor to 20’ (double the distance) my exposure is f/2.8 – two stops darker than f/5.6. This is why it is good to start at f/5.6, so you have the latitude within your equipment to shoot at f/2.8. It is much easier to continue to change the aperture value than ISO or shutter speed, especially when using flash. If the initial exposure is set at f/2.8, you cannot obtain an accurate exposure if your subject doubles their distance from the light (Figure 4).
The advantage of this setup is that it does not matter your camera position, as long as you don’t go past 90º to the light, the exposure does not change until your subject moves. This gives you the ability to shoot freely from several perspectives to create different light directions and mood without sacrificing exposure.
While on the surface, The Law of Inverse Square appears to be complicated, when in reality, the opposite is true. This rule of lighting is one that will always occur, no matter your light source or subject matter. By not only knowing the science of light, but understanding it, we can truly begin to create and manipulate light to suit our needs. Remember that light is the objective part of our craft. It will always do the same thing under the same circumstance.
I hope that these simple applications of this sometimes complicated law will help you create better images, with less error and save valuable time in postprocessing correcting exposure.
 Cris J. Duncan M. Photog. Cr. CPP is the founder of Find your Focus Photographic Education. He, along with his wife Deanna, run a portrait, wedding and commercial studio in Lubbock, TX. More info can be found at www.findyourfocus.org