
Light Meters
When it comes to measuring the amount of light, there are two types of meters a photographer will use: an “incident” meter or a “reflective” meter. While both meters do measure light, they go about it in completely different ways.
The one thing the meters do have in common is the fact that both of them are calibrated to render a tonal value of “Middle Gray” also known as 18% Gray. (Note: There are some who suggest the value is actually 12% gray, but conventional acceptance of the standard is 18% gray which is what we will accept for the purposes of the CPP test.)
Think of this gray value as the mid point between black and white.
 Measuring Ambient Light
Light meters require a bit of input from the user in order to render an acceptable result. First, set the meter into “ambient” mode. Next, input the ISO that you will be using on your camera during the exposures. Once that is set, you then have the option to select a preferred f-stop or a preferred shutter speed. Once have made your choice, the meter will provide you with the corresponding shutter speed if you chose the f-stop, or the corresponding f-stop if you chose the shutter speed.
Once the reading has been taken, you can quickly scroll through all of the “equivalent” exposures to see all of the combinations of f-stops and shutter speeds that can be used under those particular lighting conditions.
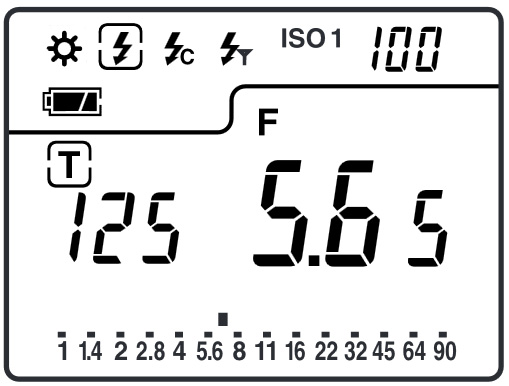 Measuring Flash
To set up a meter with both ambient light and flash capabilities, be sure to set the meter into “Flash” mode. This is usually indicated by a lightning bolt icon. Some meters also provide modes for connecting the meter to the flash by a cord (lighting bolt w/C) and possibly a mode for firing a flash wirelessly through a built-in or optional transmitter. (lighting bolt w/T)
Input the desired ISO and select a shutter speed. Most of the time, 1/125 is used, but there are situations where a faster speed may be selected to avoid any bright ambient light to influence the meter’s reading. Once activated, the meter will provide an f-stop read out.
Reflective Meter
A reflective meter measures the light reflecting from the subject or scene. Allow that to sink in for a moment. A reflective meter does NOT measure the amount of light that is lighting the subject…it only measures the amount of light REFLECTING from the subject.
 For example, if we set up a light to illuminate a white poster board and we use a reflective meter to measure the light, we will get a VERY different meter reading if we were to use a black poster board and the exact same light! Imagine…two different exposures with no change in the light. “Why?”, you ask, it is because we are measuring the light REFLECTING off the two poster boards with our REFLECTIVE meter…and white reflects MORE light than black.
If we were to actually take individual photos of the two poster boards using the exposures provided by the reflective meter, we might also be shocked at the result, which is: BOTH images look identical…GRAY. Not white. Not black. 18% GRAY!

Why does this happen? It is because the meter is designed to average the reflected light reaching the meter and provide an
“average” of all those tones that will render an 18% gray result.
To add to this explanation, consider this: the meter inside your camera is a reflective meter!
This meter “drives” ALL of the exposure decisions that are made by the camera while in Program, Aperture Priority, Shutter Speed Priority and Auto ISO modes.
When you point your camera towards a scene, the meter has no idea if it is looking at trees, grass, the sky, a bride, the sun or the moon. It only knows that there is light reflecting from all sorts of sources throughout the entire scene and its ONLY job is to find the average of all those dark sources, bright sources and all those mid tone values…and give you the average.
So, when you point the camera toward a white card, it does not know if it is white or black, but it does know its job is to deliver…GRAY. When you point the camera towards a black card, again, it does not know if it is white or black, but it does know to deliver…GRAY! That is why a black card and a white card BOTH turn out gray using a reflective meter.
This is about the time we learn that a reflective meter requires a high degree of interpretation. If you are photographing a bride in her white dress on a sandy beach in the middle of the day, chances are your camera meter is turning your bride gray. You, the photographer, have to figure out how to interpret what that meter is doing to you.
You may also elect to use a hand-held reflective meter, but the way it interprets the result is the same as your camera meter.
Spot Meters
Some photographers figure out early on that the camera meter averages the entire scene which causes all sorts of problems, so they turn to a spot meter to overcome this problem. A spot meter drastically narrows down the area it will read to render the exposure result. Some spot meters will narrow the coverage to a 1° view. A spot meter may be a hand-held meter, but most DSLRs allow for changing the in-camera meter to work like a spot meter.
While all of this seems like a good idea, you have to remember…IT IS STILL A REFLECTIVE METER. If you point the spot meter to white, you will get gray. If you point it to black, you still get gray. The best hope is to find an area in the scene that reflects an 18% gray value. This is not easy unless you have a lot of experience “interpreting” the reflective value of objects…OR, if you have a “GRAY CARD”.
By introducing an 18% gray card into the scene and placing it in such a way that it is in the same lighting as your main subject that you are trying to expose, you can now take your spot meter reading from the gray card and you will have a “perfect” exposure for that subject in that lighting. In doing this, white will be white, black will be black and all other tonal values will fall into place.
 Incident Meter
Where a reflective meter measures the light reflecting FROM the subject,
an incident meter measures the amount of ambient light falling ON the subject. That is an important distinction, because now we have a meter that does not care what is behind it, it only cares about the light that is falling on the dome or disc of the meter when providing a result.
To use this meter, simply place it near the subject and point the dome toward the light source so that the meter is at the same distance from the light source as the subject. Because it is measuring the light falling on the
forward-facing dome, it is not influenced by the color or the tonal values of anything behind it.
The result that is provided by the incident meter is still an 18% result, but it is the result of the measurement of the ambient (constant) light and not the reflected light. Setting your camera to this reading will render all the tonal values accurately. As a matter of fact, the reading from the incident meter measuring the light falling on the subject will be exactly the same as the reading from the reflective meter measuring a gray card in that same light.
In addition to measuring ambient light, many incident meters are also capable of measuring studio flash or portable strobes.
Which Meter Should You Use?
Reflective – In camera, this meter produces average results. Its usefulness is really dependent on your ability to interpret the scene.
Spot – Particularly useful for landscape and wildlife photography where up-close metering with an incident meter is impractical or impossible. Meter readings with a spot meter can be done at long distances because of its narrow angle of view.
Incident – Ideal for portraits where the light can be measured at the subject position. Also ideal for studio lighting with hot lights or strobe lights. A must for measuring any flash exposure.
Interpreting Light Meter Readings
As we have already seen, interpreting the light meter readings is a must for reflective meters and spot meters. There is also some degree of interpretation that must be done with an incident meter as well. While the incident meter does measure the light falling on the subject, that reading does not necessarily provide you with any exposure information from the shadows that may be present in the scene.
Interpreting Light and Shadow
For most photographers, the primary concern is in the exposure of the main light that illuminates the subject. That part we have covered…all you do is point the meter towards the light. But, what if you want to know the exposure value of the shadows? Most techniques simply involve taking a 2nd reading of the shadow side and then comparing the result with the first reading.
If the difference between the two readings is not acceptable and too far apart, the photographer may elect to add some supplemental lighting or “fill” light to raise the value of the shadow side thus bringing the two values closer together. This difference (Light Ratio) is a personal preference for each photographer.
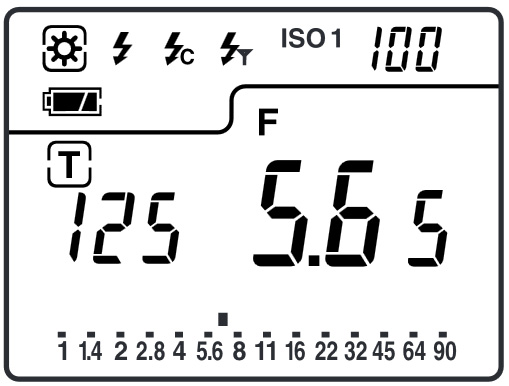
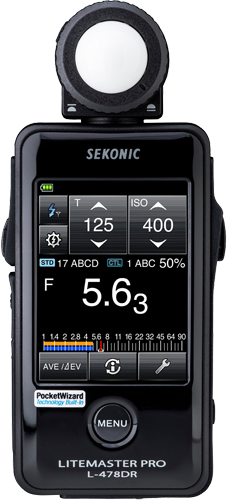
Interpreting the Read-out of the Meter
The meter itself may also require some degree of interpretation of the reading. Many meters can be programmed to take measurements within 1/10 of a stop. This provides the photographer with very accurate readings, but these 1/10th cannot be overlooked. If your meter is set to measure in 1/10ths, you have to interpret the 1/10 reading for your final exposure!
For example: The read out on the meter at left is F5.63 at 1/125. That means the f-stop is F5.6 and 3 tenths. While our cameras don’t provide f-stops in 1/10 increments, it does have the capability of setting it in 1/3 or 1/2 stop increments.
If we carry out this exposure, we may actually select F6.3 if our camera is set up in 1/3 stop increments or we may choose to “round up” to F6.7 (sometimes called, “F5.6 and a half”) if our camera is in 1/2 stop increments.
These are decisions you want to be familiar with as you look at your meter readings paying close attention to that 1/10 reading. If you are not careful, you may glance at F8.09 and carelessly use F8 when, in fact, the reading is a mere 1/10 of a stop from being F11.