
 Placement Matters
by Cris Duncan
In previous articles, we have discussed a few critical laws to understand before lighting your subjects. First, the size of the source relative to the distance from subject. If you missed the previous article, it can be found in the October/November 2012 issue of The Photographer magazine. We have also discussed the Law of Inverse square in the December/January 2012/13 issue. In this article we will discuss another important phenomenon of light, the placement.
It doesn’t take one long to realize that lighting and light placement can be a frustrating ordeal. My hope is to help relieve that by providing an understanding why light does what it does so you can then use it to your advantage. In that previous article, we briefly discussed using the edge of the light to help combat the effects of the Law of Inverse Square and we will continue with that this time.
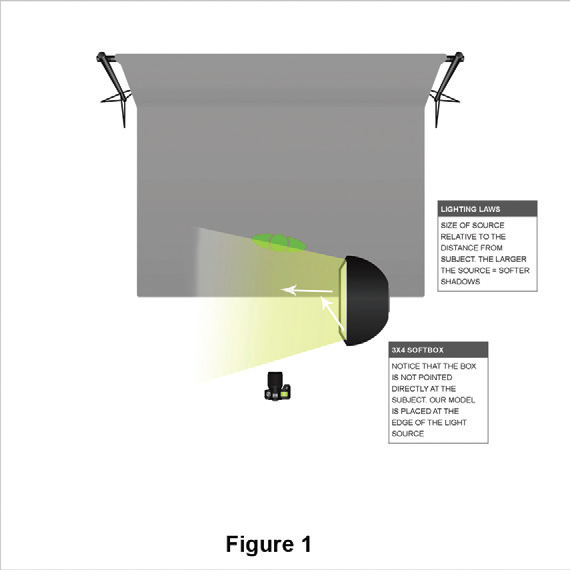 In its most simple form, using the edge of light is a subtractive technique where we take light away from a scene (light quantity) and in turn are making our light source larger, in most cases, resulting in a more even, efficient light fall-off (light quality) to produce a desired ratio and lighting pattern. In the studio, this is easily done by simply rotating our light source to where it is more in a parallel orientation to our subject (Figure 1).
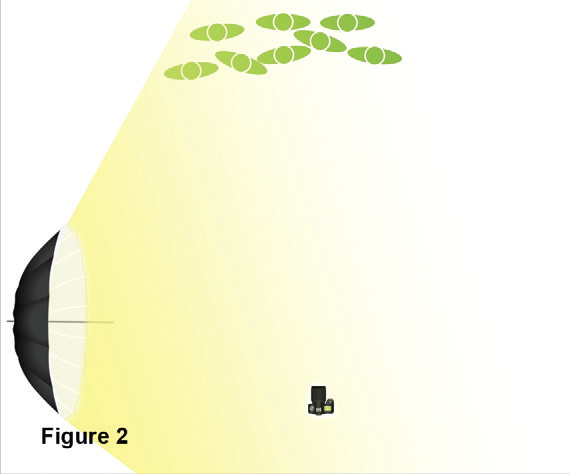 I use this often when working with both individuals and larger groups both in studio and on location. We will look at a few examples. Let’s begin in the studio with a large grouping. For these situations I will often use a large umbrella and have it positioned parallel to my subjects and far enough behind so that the spill is striking the closest subject (Figure 2). This arrangement places my subjects at the edge of the light. This method will give you the freedom to photograph larger groups with more light control and minimal light fall-off. Please note, it is important to remember that when you do this, your light source needs to be farther away from your subjects, making your source smaller. The smaller the source, the harder the shadows. If you prefer a softer light quality, you will need to begin with a larger source. In the example, I am using a 7’ umbrella (Figure 3).The placement of the light source will dramatically change the light pattern and ratio on your subject. It is up to you to determine what you desire.
 Now, we move to a location other than our studio. The same rules apply here as they do indoors- Light is light, no matter the source. Let us take a look at another large group taken outdoors. In this situation, I am looking for the edge of light, because it is more difficult to control it. The most common place to find it is in open shade of a building or a foliage. In the following image (Figure 4), I placed my subjects at the front edge of the shade from the overhanging trees and then added a studio strobe with another large umbrella for my main light.
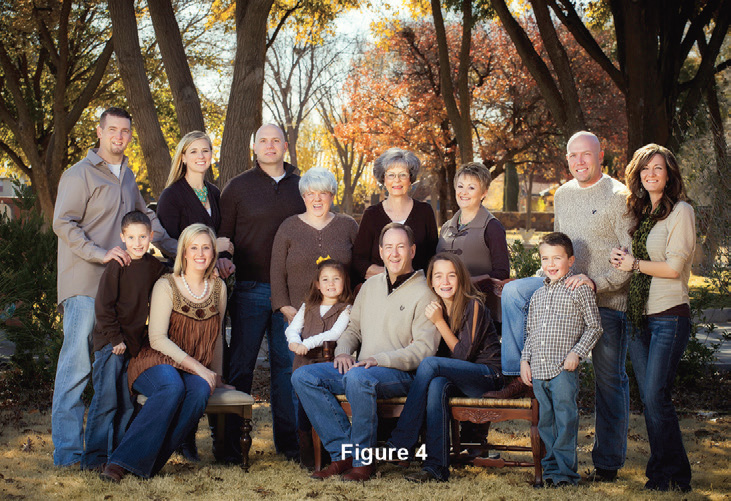
 This does a few things for me. First, by having them in the shade at the edge of the light, it in essence makes the harshness of the Sun into a nice large source producing a soft light quality. Another thing it did was reduce the amount of light (light quantity) on their heads. I was using the ambient light from the sun in this situation to act as a hair light, a means to separate them from the background. The downside to this is that the shade is very flat lighting. So, in order to provide some light direction and add another level of separation, we added a studio strobe as the main light, placed in a similar position as if we were in the studio (Figure 5).
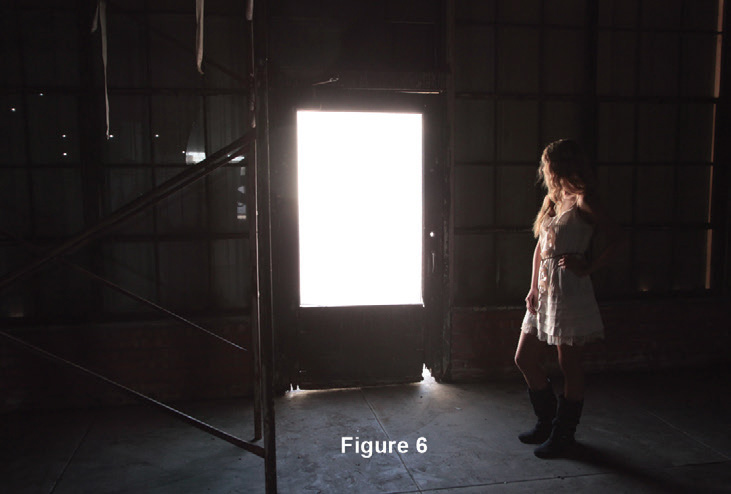
Whenever we are not in the studio, we are always aware of light and where the best placement for our subject would be. Windows, for example, operate just like a soft-box. Knowing that, whenever we are using a window as our light source, we often place the subject at the edge of the window, just as we would in the studio with the soft-box (Figure 6).
 One final example is working with ambient conditions. If I am photographing in a hotel or conference center and have only my camera with no additional modifiers, I will place my subject at the edge of the overhead lighting (Figure 7).
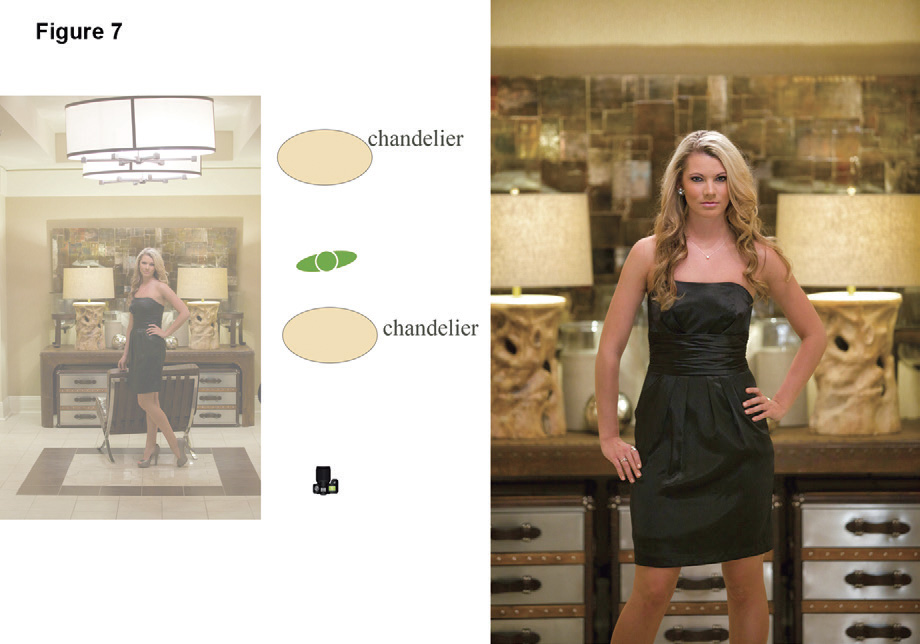 In this hallway, the light source is the two overhead chandeliers. To photograph my model without having dark circles under her eyes, I simply backed her up to where she was at the edge of the light spread from the chandelier. I simply placed her between the two lights, putting her at the back edge of the front light and the front edge of the back light. We were fortunate to have a location with multiple overhead lights. One serves as my main light and the other as a rim/hair light to provide separation. This technique is great for any light position you choose to use it. By doing this, I was able to remove her dark circles, allow light in her eye and produce a more efficient light quality, meaning reduce the amount of fall of due to Inverse square.
Wherever or whoever you photograph, this is an important phenomenon to be aware of. Like so many things, this is not always the method you will need. However, if you are desiring a soft light quality with minimal fall-off, then this technique will always be there to help. Remember that light is governed by physics and will always do the same thing under the same circumstance. It is our job as photographers to use the light effectively for the benefit of our clients.
Happy creating!
 Cris J. Duncan M. Photog. Cr. CPP is the founder of Find your Focus Photographic Education. He, alongwith his wife Deanna, run a portrait, wedding and commercial studio in Lubbock, TX. More info can befound at www.findyourfocus.org.