
Selecting the right background for your outdoor and locations sessions can be something of a challenge. This assignment is designed to help you discover what makes a great background and how to use you background to create images with impact. While you will be completing this assignment in a few days, the process of finding new and interesting places to photograph will continue throughout your career.
WHAT MAKES A GREAT BACKGROUND?
Think the 5 D’s:
- Darker
- Depth
- Dense
- Design
- Diverse
Darker
Generally, I like a medium to dark background. This way, the subject will stand out from the background. This is not to say that you cannot have light color backgrounds – you need those too, but a darker background will give you great results with little finishing work.
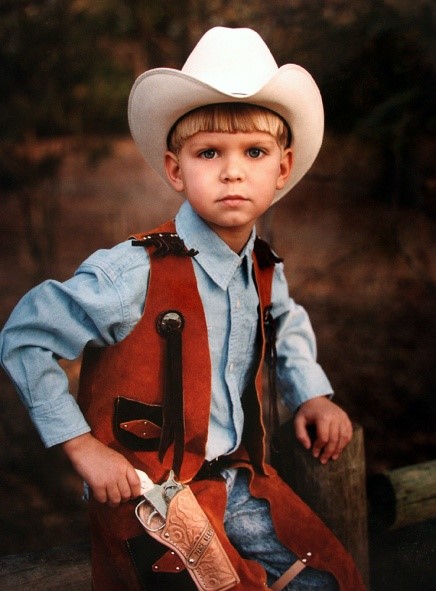
The dark background on the left makes the little cowboy stand out.
The bright highlights and sunlit water in the background on the right does not set the couple apart from the background making the background seem “busy”.
Depth
Try to see your background as something other than a one-dimensional backdrop, but rather a three dimensional location with depth.
See if you can spot foreground, middle ground and background in the locations that you scout.
Dense
Try to find locations with dense foliage so as not to see through it.
Try to avoid backgrounds that reveal hot spots of sunlight and shadow.
The image on the left has uniformly even tones that keep the viewer within the scene.
The bright areas in the image on the right take the viewer away from the subject.
Design
Look for leading lines, patterns and diagonals in a location. One dimensional backgrounds such as a wall can work great if there are architectural or decorative designs.
While the background on the left is one dimensional (flat), it does have strong design elements that complement the image.
The image on the right has strong diagonal and leading lines and strong repetition because the image was taken down the length of the wall rather than shooting straight into the wall.
Diverse
You will not really want to drive all over town photographing, so try to find locations that offer three or four unique perspectives during a session. Getting variety from a single location is important when you have a limited time for sweet lighting.
BECOME A STUDENT OF LIGHT
As you begin your quest to find great backgrounds and locations, look first for the elements of a great background, but your job is not yet done. You now have to decide when the best time of day is to work in each location. For many locations, you may find the lighting is best in the morning or late afternoon, while other locations will only have a few minutes in the day where the lighting is suitable.
You will also discover seasonal changes in the lighting. Some locations photograph great in spring and fall but lack great lighting in the summer. Try to find the time of day where each location has its’ “sweet” lighting.
PRO TIPS
*Metal buildings, overhead doors, vents and stairs can provide great background opportunities Try to work in your locations when the lighting on the background is the same lighting on your subject.
*Scout around churches and universities for interesting places to photograph. Take your 200mm lens when you are scouting and look for different perspectives through the camera
*A good background will often make an interesting image even if no one is in the scene.
*Higher camera angles will help eliminate bad horizon lines and distracting backgrounds.
*Consider “safari” sessions to other great locations out of your immediate area.
ASSIGNMENT
- Find at least three locations to photograph and find at least three unique perspectives in each of the locations (Three locations should yield 9 “backgrounds”)
- Create 9 images (3 from each location) of just your background selections.
- Create 9 separate portraits, one from each of your new perspectives
- Describe why you choose each of your new backgrounds and what type of session you might expect to photograph there
(Image 1) (Image 2)
Describe what it is that makes the background work in each of the 6 images.
Image 1
Image 2
Image 3
(Image 3)
(Image 5)
(Image 4)
Image 4
Image 5
Image 6
(Image 6)
Assignment
This is a rather simple assignment to do, but you should take the time to really observe what you see in your viewfinder as you go through the process.
You should also really study the results of your images. I encourage you to print them out when you get home and lay them side by side to get the most out of your evaluation.
GETTING STARTED
We are going to begin by setting up a series of “test images”.
- Select a large background area such as a large area of greenery or a background with an architectural interest
- Position your subject about 10 feet from the background and instruct them not to move
- Position yourself about 10 feet away from your subject and do not move
- Create a series of images without you or your subject moving using 28mm, 50mm, 75mm, 100mm, 150mm and 200mm
- Repeat the entire series with your subject 20 feet away from the background and with you 10 feet from the subject
EVALUATE YOUR IMAGES:
Describe what you found:
How did the lens choice impact depth of field with the subject 10 feet from the background?
How about at 20 feet?
How did the lens choice impact the relationship of the subject to the background at 10 feet?
How about at 20 feet?
How did the lens choice impact what you saw in the background or what you did not see in the background?
If you or your subject had been allowed to move left or right(keeping the same 10 feet and 20 distances), could you have found better areas in your background to use with your subject?
What is your overall impression of the results?
The next exercise is to evaluate the lens choice for a given composition.
- Use the same background location that you selected in the previous series.
- Position your subject about 10 feet from the background
- Create a “head and shoulders” portrait using your 28mm lens. You can get as close as you have to
get a proper composition.
- Next, try to get the exact composition and framing using 50mm. Back up as needed to keep the subject the same in the viewfinder.
- Repeat using 75mm, 100mm, 150mm and 200mm. Keep backing up so that each image is as close to the same crop of your subject as possible
- Repeat the entire series with your subject 20 feet from the background
EVALUATE YOUR IMAGES
Describe what you found:
How did the lens choice impact depth of field with the subject 10 feet from the background?
How about at 20 feet?
How did the lens choice impact the relationship of the subject to the background at 10 feet?
How about at 20 feet?
How did the lens choice impact what you saw in the background or what you did not see in the background?
If you or your subject had been allowed to move left or right (keeping the same 10 feet and 20 distances), could you have found better areas in your background to use with your subject?
What is the overall impression of the results?
Bonus Question
Why did we not do either of these exercises with the subject standing right next to the background?